When putting together your own modular system, a vital component that’s easy to initially overlook is buying a collection of patch cables to use with it. What should you be looking for when you go cable shopping?
Most important is that you need cables with plugs which are compatible with the system you’ve chosen. Eurorack uses 3.5 mm connectors; most 5U or MU (Moog Unit) systems use 1/4” (6.35 mm) connectors; Serge uses banana connectors; Buchla uses a combination of banana and TiniJax; some micro systems use pin connectors. (See page 15 of Patch & Tweak for more background.) The advice below is written for Eurorack format systems, but the basic principles apply to most of them.
Personal Taste
For many users, patch cables are an aesthetic choice. Some like their cables to be all of one color such as black, white, or pink; some prefer cables with braided jackets; some choose cables that glow in the dark.
In truth, the difference between cables is small enough that most of the time, you can make these choices without sacrificing performance. But if you are concerned about optimizing performance, here are a few things to think about.
Wire Gauge
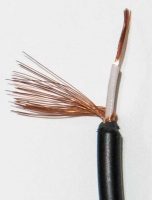
 Eurorack cables have a central conductor, and a shield that wraps around it to keep noise from affecting the signal inside or to stop the signal inside from interfering with others outside. These are separated by an insulator, and encased in an insulating jacket.
That central conductor is usually 26 AWG (American Wire Gauge), or 0.016 inches (0.405 mm) in diameter, yielding 0.041 Ω (ohms) per foot (0.134 Ω per meter) of resistance. A few use slightly thinner 28 AWG wire, which is 0.0126 inches (0.321 mm) in diameter, and yields 0.065 Ω per foot (0.213 Ω per meter). In general, lower resistance is better – but since most patch cables are under a yard or meter in length, the resistance isn’t too much of an issue. However, the thinner 28 gauge wire may be less robust if the cable gets physically abused over time.
Another potential issue with cable is capacitance. The size and construction of the insulation between the conductor and shield can increase or decrease this number; lower is better. Too much capacitance can smear the shape of the signal going through the cable, which can cause problems with gates, clocks, and triggers, and reduce high frequency response. Again, most patch cables will not exhibit these problems, but I have experienced these issues with cheap 6 foot cables I tried to save some money on.
Jackets
Different brands of cables may have different thickness of jackets protecting them. Top: Doepfer; middle: Black Market Modular; bottom: Luigi’s Modular Bucatini (braided).
The cable jacket – the coating the covers the wires inside between the jacks at its ends – also falls into the “personal taste” area, but is definitely worth considering. They are generally some form of plastic or PVC tubing or a nylon braided sleeve, as seen above.
In general, if you are running longer cables in hostile environments (such as between cases, in a live environment), a thicker jacket will improve the longevity of the cable. If you are running cables inside a smaller portable case, thinner jackets will make it easier to keep them out of the way. Braided jackets are stiffer, but less likely to tangle with each other.
If you have a moderate to large system at home, then how the cables feel – including their stiffness or “drape” – will come into play. Again, this is personal taste; try a few cables from different manufacturers to see what you personally like. You can see from the photo above that the thinner Doepfer cables likes to “kink”, while the Black Market and Luigi’s cables are more prone to both lie and hang straight.
Plug Barrels
The diameter of the barrel around a plug trades off how easy it is to grab, versus how closely you can pack them together in a dense module. Their length can determine whether or not you can close the lid of your case with your patch intact. From left to write are a cheap generic brand, Luigi’s Modular, Hosa, and Black Market Modular.
Connected to the thickness of the jackets of your cables is how thick the barrel of the plug at the ends of the cables are. In the tight, cramped confines of many Eurorack modules, thinner barrels can be desirable. I have some audio cables using professional connectors from Canare, and their barrels are too large to fit side by side in many Eurorack modules. On the other hand, Polyfusion patch cables were famous for having large, easy to grab barrels; they could get away with that because their larger format allowed for more room around the jacks.

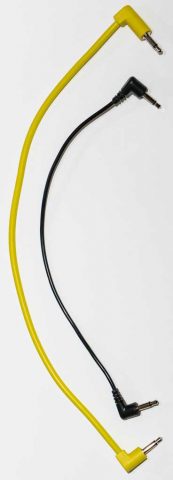
Right angle cables from Luigi’s Modular (yellow) and Tendrils (black) are pictured at right. The Luigi’s PAR cables have two different height plugs so you can overlap them, plus a short strain relief, but are thicker than average. The Tendrils have a lower profile and thinner jacket making it easier to pack them together in tight spaces.
For my live performance case, I use right angle cables for all of the elements I can leave patched together, such as clock distribution, effects sends and returns, connecting the most-used modules to dedicated mixer inputs, etc. I then use normal cables for all live patching I do during a performance, including changing modulation and trigger routings. This has greatly reduced my setup time (and mistakes!) when I gig or jam with others.
You will also find different cables have different qualities of plugs, although that is very hard to discern from just looking at them – problems may appear only after repeated use. A few users have tales of woe from buying cheap cables, and then having the tip of one of their plugs stay behind in the jack they were plugged into.
Color Coding
Some users like all of their cables to be the same color. Some don’t care what colors they are. A few color-code their use of cables.
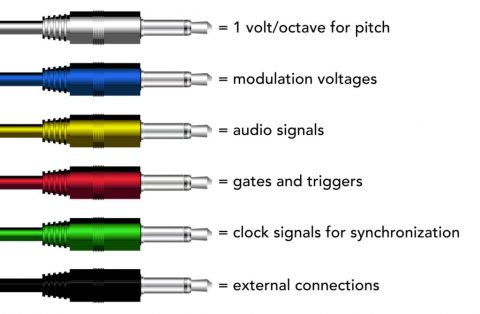
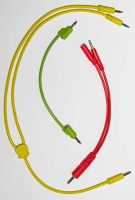
The most common color coding scheme is based on length, making it easy to reach over and grab a cable long enough for the next connection you want to make. Tiptop Audio StackCables are based on this approach.

I’m now in the habit of using these colors for virtually all of my patching – especially in my live performance case, to make it easier to decode and trace a patch during the panic of improvisation. For that, I’ve taken it one step further and have started adding different color cable ties to the end cables, so I can quickly see, for example, “The blue modulation cable with the green tie, patched to the filter cutoff? Oh – that’s coming from output 6 of the Levit8 (which has five other blue cables coming out of it).”
Multiples (Splitters)
Some examples of “floating” multiplies include (from left to right) the Plankton Electronics Ninja Star, Black Market Modular MonoMult, and Hosa Knucklebone.
Quite often, you will want to send the same signal to more than one location. If that signal is the control voltage for pitch, you’re better off using an “active” or “buffered” multiple, as I’ve described in the past. But for simple gates, triggers, clocks, modulation, and even audio signals, you can quite often get away with passive multiples – be they modules in your case, free-floating splitters you directly patch into, or special cables.

(Note: Do not use a splitter or passive multiple to mix signals together. There are a few cases where you can get away with it – such as summing together multiple gates from modules that have the proper output protection circuitry – but in general it’s a bad idea and may not work very well.)
Can I Just Use Stereo Cables & Multiples?
Maybe. Probably. But possibly not. It all depends on the construction of the jack you are plugging into.
Inside each jack is a metal tab that is supposed to rest in the notch of the tip of the plug; in a stereo jack, there is a second tab that touches a narrow ring just below that tip. Plus, the body of the jack (and possibly an additional tab) touch the sleeve of the plug for the ground connection. If any of these tabs are out of alignment, you could either get a short circuit joining signals that are supposed to be separate, or an open circuit where the signal is not getting through. For example, I’ve personally bought some cheap headphone splitters that shorted out the mono signal in a normal Eurorack cable. But, many others use stereo splitters and cables without problems.
Something else to take into account is that actual stereo (or at least, three conductor) connections are becoming more common. In the Eurorack world, a few modules use stereo jacks for select audio inputs and outputs. Arturia uses a stereo 3.5 mm jack for DIN Sync, and many manufacturers use stereo 3.5 mm jacks for MIDI. (Alas, there are two “standards” in that world, meaning you may need two different types of adaptors.) You might be better off keeping stereo cables for actual stereo or three-conductor connections, just to keep things straight.
Attenuators
There are several different cable-based solutions for attenuating a signal between modules, including generic stereo headphone volume controls (top), the Boredbrain Splix (middle/left), and the RYO Airtenuators (bottom/right). Not pictured is the popular KOMA Attenuator Cable.
Often, you will want to attenuate (reduce) the level of a signal that you’re patching from one module to another. Ideally, modules would have attenuators or attenuverters on all of their control and audio inputs; unfortunately, that is becoming less common as manufacturers try to squeeze more functions into smaller panels. You can buy dedicated attenuator modules (or even better, utility mixers).
There are also a few cables that have attenuators built into them; a few are pictured above. The Splix can be used as a crossfading splitter or as a passive mixer, depending on which way you patch it. Some – such as the RYO Airtenuators – note which direction the signal is supposed to flow through them; you don’t want to short out the output of a module by running it the wrong way. I personally test the headphone volume controls I use to make sure I am patching a signal in the direction of maximum resistance, which will put less strain on the output sections of modules. For the stereo headphone volume control pictured above, it is better to connect the plug end to the output of a module.
tl;dr
That was a lot of words for what should be a simple subject. And it is a simple subject; it’s just easy to over-think it. In reality, you can not think about it at all and just grab the nearest cable. Or, you can use the information above to make a plan for what types of cables are going to work best for you.
(FTC Disclosure: I have received free or discounted cables and related widgets from Hosa, Black Market Modular, Luigi’s Modular, and Tendrils. I have also bought cables at normal price from all of them. Their support has not influenced what I wrote about them or their competitors above. All of the photos above are from cables I use with my own modular systems.)


What are the colored cable ties you’re referring to that you put on your cables to help further identify them? I’m not sure I know what those would be.
Here is a link to exactly what I purchased: https://amzn.to/2XwAaHa
Genius!
Do you use pluggable touch plates (not sure if that is even the correct term) ever to make connections as part of a live performance? I have heard about these but don’t know any manufacturers and was wondering if there are any possible down falls with using them.
They are called AllFlesh, and are from Landscape.fm: https://www.landscape.fm/allflesh
I used them a bit during my performance at Knobcon this year, to make it appear I was speaking in a foreign language or tapping into my head and hearing morse code: https://www.youtube.com/watch?v=G5Li_OsqhBU
In general, they work far better than expected. I noticed they do add a little bit of open-ground buzz to audio signals in particular; they’ve worked fine for me for modulation and gates. You don’t need to use just use your fingers; I’ve also played with using my lips and tongue, which also works.
I use bananuts with my synth, but the cables now fall out easily. Are there any cables with a longer jack to work better with Bananuts?
Unfortunately for your situation, all plugs should be the same length; that’s the only way to make sure the notch in the tip of every plug will align properly with the corresponding contact in any jack.
It sounds like the Bananuts are either thicker than the nuts that came with your module(s), or they need to be tightened down a bit more. And the manufacturer of your module probably carefully mounted the jacks so just enough poked through the front panel for the nuts they normally used, instead of having a little extra. You might get away with it, though, if the front panel is sandwiched between two nuts – one behind the panel, and one in front of it. If that’s the case, you could remove the front panel, spin the nuts behind the panel down just a little bit (by the amount that the Bananuts are too thick), then re-assemble. But otherwise, you’re talking major mechanical surgery.
Thanks! But I just realised that you have to remove the other nuts! Silly me!
Ahh! That makes more sense. I have not worked with Bananuts yet, and didn’t know if they were indeed thicker etc. Yes – they are replacement, not an add-on. A new wheel, as it were, not just a hubcap on top of that wheel. 🙂
Where can you find longer patch cables? Is there a limit on the length that you can find for them? 3′ is about as long as I have been able to find…I’m was hoping for something around 4′
Yes – it’s definitely possible to get patch cables over 3′. At that point, they tend to be measured in centimeters rather than inches, so search for “150 cm Eurorack patch cables”, for example (120 cm are closer to 4′, if you can find them; they’re not as common). I just did a quick search, and a lot of hits for Black Market Modular cables of that length turned up (that’s the brand I use most often); ExcelValley on Amazon also has a lot of different lengths, including 120 cm/47″: https://amzn.to/3wAvjp1
I just purchased a Scarlett OctoPre 8-channel mic pre with the hopes of multi-tracking my modular (up until now I’ve been mixing in my case, and sending out a stereo pair of 1/4″ TRS cables from my Intellijel performance case into an Apollo Twin X interface). Wondering if you might be able to give guidance on what type of cable I should use to run these individual stems out of my Eurorack case and into the OctoPre (which accepts balanced and unbalanced inputs). My hope was to run balanced cables (perhaps this comes from an misguided idea that in a studio setting, it’s wise to opt for balanced cables when possible to mitigate noise), such as a 3.5mm TRS to 1/4″ TRS cable, but I’m wary of, for example, plugging the 3.5mm TRS end into the output of the Mutable Instruments Beads to record its output as a stem. FYI I was originally looking at something like this: https://www.harpooncables.com/product-page/1-8-to-1-4-trs-eight-channel-snake
Should I opt for 3.5mm TS to 1/4″ TRS instead? Or 3.5mm TS to 1/4″ TS? The cable run from my case to my interface/mic pre is only about 4 feet.
Thanks in advance for your help Chris! Grateful for all you do for the modular synth community!
Like you, I prefer to use balanced studio connections whenever possible. In reality, this is less important for short cable runs (in other words, how close is your interface to your modular?), and more important the longer the cable runs become.
I don’t know of any module that supports 3.5mm balanced connections. Some support 3.5mm stereo, but of course that’s a different thing.
I personally use modules like the Praxis Snake Charmer Out to get multiple balanced audio stems from my big modular to my audio interfaces. (For my gigging case, I have an Expert Sleepers ES-9 to get digital directly into the computer.)
If you’re just using 3.5mm outputs from your modular, then you’re okay going unbalanced as long as the runs are short. If the input to your audio interface is balanced, they’ve hopefully wired it correctly internally to handle having an unbalanced cable plugged in; if you want to play it extra-safe, buy an already manufactured unbalanced 3.5mm to balanced TRS or XLR cable, or wire your own following the recommendations in the venerable RaneNote 110: https://www.ranecommercial.com/kb_article.php?article=2107
Thank you for your kind words (they really are appreciated); I hope you find the above useful. If you have any other questions, feel free to ask.